
| MaxQuickLoad® Excel Data Loader |
• Easy to use • 30-day free trial • Get started in Minutes |
• Update Any Maximo Record Type • Preview Changes Prior to Updating • Load Asset Specifications |
How to Update Job Plans Using MaxQuickLoad®
Overview
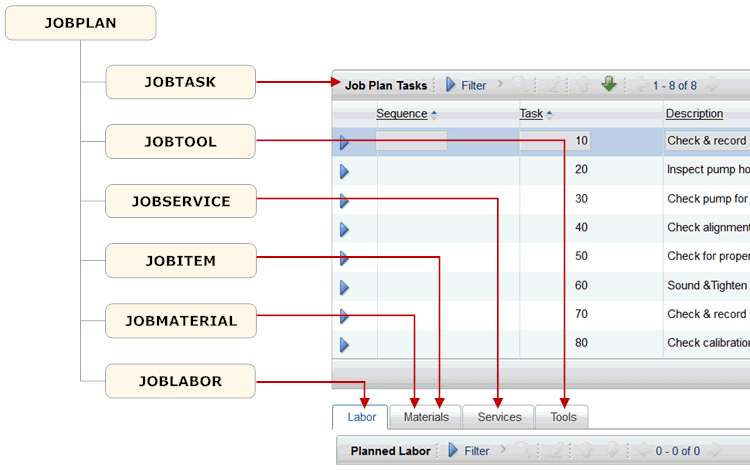
A Job Plan is a detailed description of work to be performed on a job. A Job Plan includes description and lists of estimated materials, items, labor, and tools to be used on the job. Each Job Plan can be divided into a sequence of tasks, which need to be performed to complete a job plan. A job plan may also have an associated safety plan. Job Plans can be copied to a work order's work plan through the WO.JPNum attribute. Preventive Maintenance uses Job Plans to generate scheduled work orders.
The Job Plan is a system level object that can be defined to exist at the system level, organization level or site level.
The key attributes for this object are ORGID, SITEID, JPNUM and PLUSCREVNUM.
The diagram below shows how the Job Plan child objects relate the the Maximo Job Plan application screen.
Job Plan Revisions
Maximo 7.5 introduced a new attribute on the Job Plan. The JOBPLAN.PLUSCREVNUM attribute maintains the Job Plan's revision number. The PLUSCREVNUM must be provided when updating Job Plans using the MIF. The PLUSCREVNUM is set to 0 (zero) when creating new job plans. When updating existing job plans the following rules apply:
IMPORTANT: Only job plans in Draft or PNDREV status can be modified. Active job plans cannot be modified. If you attempt to modify an active job plan through the MIF you will receive the following error:
BMXAA0024E - The action ADD is not allowed on object JOBTASK. Verify the business rules for the object and define the appropriate action for the object.
To update an active job plan, you must first revise the job plan. You can either revise the job plan in the Maximo application or by using MaxQuickLoad. To revise an active job plan using MaxQuickLoad, increment the PLUSCREVNUM field by one and set the job plan status to PNDREV. Next, upload the changes using the new revision number, then activate the new job plan revision. Maximo will set the status of the new Job Plan revision to ACTIVE and set the status of the previous revision to REVISED.
Loading Job Plans
If you are creating new job plans, the best method is to first add the new job plan records, then add the job plan tasks. The instructions below describe the steps for loading new job plans and job plan tasks:
Prerequisites:
You must create the MQLMXJOPBLAN object structure and import it into MaxQuickLoad. See Create the Job Plan Object Structure section below.
Step 1: Load the Job Plans
- Create a new MaxQuickLoad upload spreadsheet using the MQLMXJOBPLAN object structure.
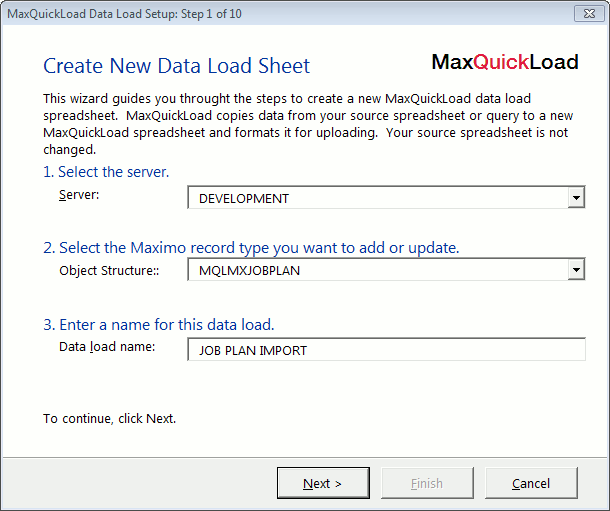
a. In MaxQuickLoad, select the Excel menu MaxQuickLoad -> New.
b. Select your server.
c. Select the MQLMXJOPPLAN object.
d. Provide a name for your data load.
e. Click Next >.
f. Select the method you want to use to upload the data. - In the Map Maximo Fields form:
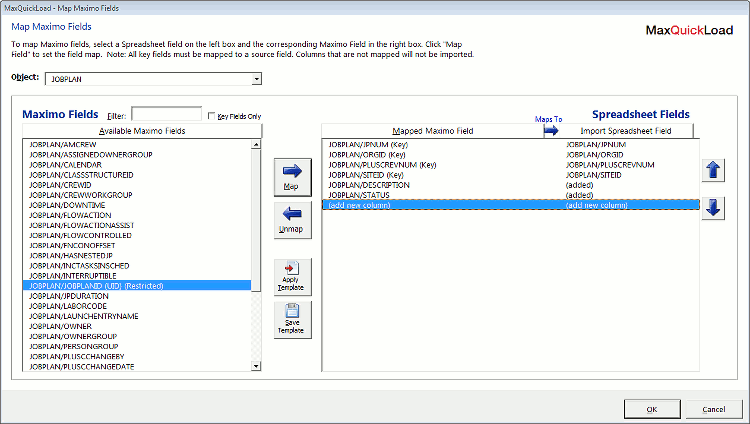
a. Select the JOBPLAN object.
b. Map the following columns.
- JPNUM
- SITEID
- ORGID
- PLUSCREVNUM (Set to 0 for new job plans)
- DESCRIPTION
- STATUS
- Map additional fields if necessary.
- Click OK.
- Complete the new data load wizard steps.
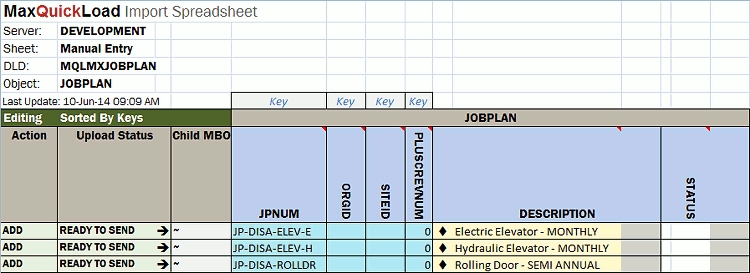
- Finalize and upload the job plan records to Maximo. The new job plan are created in Maximo with a status of DRAFT.
Step 2: Load Job Plan Tasks
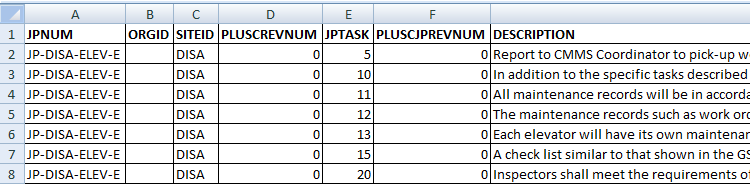
- Prepare the job plan task spreadsheet. that you will import. For each task that you will import provide the following columns in your import spreadsheet:
- JPNUM
- ORGID
- SITEID
- PLUSCREVNUM
- JOBTASK/JPTASK
- JOBTASK/PLUSCJPREVNUM
- JOBTASK/DESCRIPTION
- Create a new MaxQuickLoad upload spreadsheet using the MQLMXJOBPLAN object structure.
a. In MaxQuickLoad, select the Excel menu MaxQuickLoad -> New.
b. Select your server.
c. Select the MQLMXJOPPLAN object.
d. Provide a name for your data load.
e. Click Next >.
f. Select the method you want to use to upload the data. - In the Map Maximo Fields form:
a. Select the JOBPLAN object.
b. Map the following columns.- JPNUM
- SITEID
- ORGID
- PLUSCREVNUM
b. Map the following columns.- JOBTASK/JPTASK
- JOBTASK/PLUSCJPREVNUM
- JOBTASK/DESCRIPTION
- Click OK.
- Complete the new data load wizard steps.
- Finalize and upload the job plan task records to Maximo.
Additional Information on Loading Maximo Job Plans
IBM Support Documents:
Creating the Job Plan Object Structure
You must create a Job Plan object structures to update Job Plans.
Prerequisites:
You must have administration level access to Maximo and the rights to the Object Structures application.
Procedure:
To create an object structure to load job plans, complete the following steps:
- In the Object Structures application click the New Object Structure icon.
- Specify a name for the object structure, for example MQLMXJOBPLAN.
- Specify INTEGRATION in the Consumed by field.
- In the Source Details section add the following objects:
Object Parent Object Object Location Path Relationship Object Order JOBPLAN JOBPLAN 1 JOBTASK JOBPLAN JOBPLAN/JOBTASK JOBTASK 1 JOBLABOR JOBPLAN JOBPLAN/JOBLABOR JOBLABOR 2 JOBMATERIAL JOBPLAN JOBPLAN/JOBMATERIAL JOBMATERIAL 3 JOBITEM JOBPLAN JOBPLAN/JOBITEM JOBITEM 4 JOBSERVICE JOBPLAN JOBPLAN/JOBSERVICE JOBSERVICE 5 JOBTOOL JOBPLAN JOBPLAN/JOBTOOL JOBTOOL 6 - Click Inbound Setting Restrictions in the Select Action menu.
- Check the Restricted box for:
- JOBMATERIAL.LINETYPE
- JOBMATERIAL.ITEMSETID
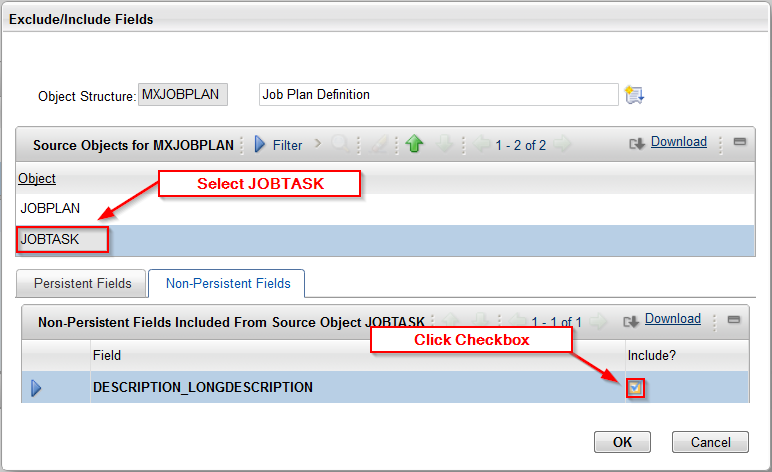
- Click Include/Exclude Fields in the Select Action menu.
- Click Job Task and check the Include box for DESCRIPTION_LONGDESCRIPTION.
- Save the object structure.
- In MaxQuickLoad go to the Excel menu MaxQuickLoad > Data Objects.
- Click Refresh Schemas.
